Blog

 RSS Feed

» Listings for 2021

  1. For many people having a ‘bespoke’ item made conjures up an image of something costing lots of money. It is, afterall, what ‘other’ people with lots of disposable income do. But is it? Or does it depend on where you place value? For some people the latest electronic gadgets are their thing. For others it is designer clothes, fine dining or having a nice car.


    Yes, there is a cost implication when you have something made for you. However, I think there are a number of things that you need to offset against that, and these go beyond the price of the item. 


    I am fortunate to have a few regular customers. One has always employed artisans to undertake work for her. It was a model that she grew up with and has continued throughout her life. She knows what she wants and gains satisfaction from knowing the artisan making her product.


    In many ways I often think we have lost touch with our manufacturing heritage here in the UK. That understanding of the processes involved in creating a piece and very much part of our industrial heritage. The availability of different price brackets on the high street has drawn people to a more disposable culture and perhaps lowered expectations around the life cycle and life expectancy of a product. Concerns around working conditions, sustainability and the environment only serve to highlight this disposable culture even more.


    In a small business like mine we are often competing with high street expectations and prices. I’ve had many conversations with people who would clearly like something made but don’t realise the processes involved and expect a high street price. 

    IMG_5402

    This image is well known on the internet. It makes the point about what happens when the client asks if you can do it cheaper.


    I mentioned earlier that there were some things that you have to offset. So what are they? Let's start with peace of mind. Having something made for you means that you can get what you are looking for. You are also investing in yourself because you are worth it. This may be a hackneyed line but it is nonetheless important. I have made several bags for a lady who wants the bag for specific purposes, as each bag needs to contain specific items. With any commission like this there is always a discussion considering the different aspects of the design; the size, shape, requirements, leather type, lining fabric, position of the pockets and closures. I then put together the design and create a mock up of the bag so we can test the function. Alongside this we will look at samples of leathers and fabrics as we make important decisions about the bag. Only when we have made any adjustments and finalised the details, I will then make the bag.


    Getting an item that fits your requirements is another bonus of having something made for you. I make my leather belts to fit the person, not a ‘size’. There is no standardised sizing within the fashion industry. You could pick a certain clothing size from a selection of well known high street stores and each item would have differences in measurements, despite being advertised at the same size. It is the same within the shoe industry. Why then would you come to an independent maker? Because you want something that fits you. Because you don’t want to be traipsing around stores, be they actual shops or online stores trying to work out if that item will fit you. Because you have better things to do with your time and don’t need the hassle.


    A leather belt that fits you is a thing of great beauty and comfort. The belt adjusts to your shape and will last a long time. You can choose your leathers, maybe have belts in different colours or add some surface decoration, all safe in the knowledge they will fit you, even if you happen to gain or lose a few pounds.


    As one of my customers you get the benefit of my experience and the wealth of specialist knowledge I have in my field. This is something that I have gained over years and gives me confidence in the quality of products that I offer and the after sales follow up. You are dealing with me, not a large company with a switchboard or helpdesk. I try to explain the process to potential customers, highlighting the steps involved along with the benefits to help them make an informed decision. For some it may not be the right time to make that purchase, for others it is what they are looking for.


    The process does take time. I can’t make a belt in ten minutes and wouldn’t either. But, working with the customer to create a product that will have value to them should not be rushed or underpriced. 

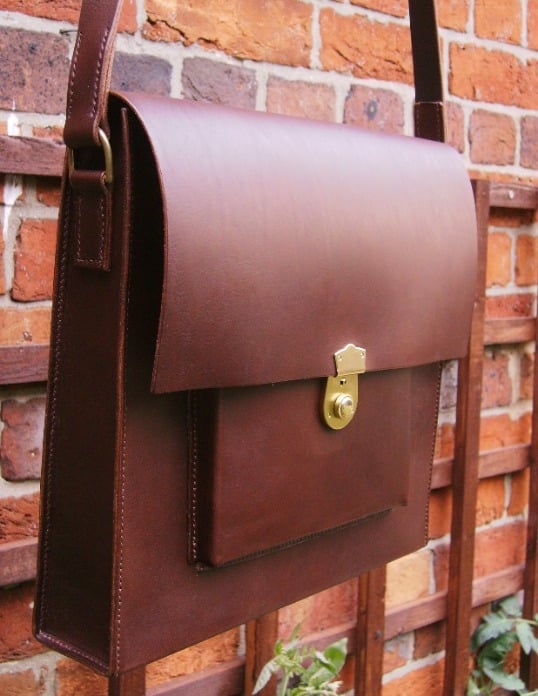
    The difference? Messenger bag or Client asking for cheaper 2 ?

    (NB. All typos and errors in grammar are definitely mine).


  2. Want to know what got me up early on frozen mornings to photograph spider webs in my PJs? Then read on… (Please note I did have a coat and boots on, nothing to get me arrested).

    I recently completed an online course in digital textile design at Central St. Martins, part of UAL. This was just a short course that ran for four weeks, taking us through the design process to produce digital designs for textiles (and more). I say just a short course but we had homework! It may have been only an hour and a half tuition a week for those four Mondays but a lot was packed in. 

    Our brief was 'code create' which gave me so many options to pursue. We were still in lockdown so I decided to look at what I could find in my local area, where nature featured highly in my research.

    EB Primary 2

    Spiders webs, leaves, bark and textures all featured in my primary research. I looked back at flowers I had photographed over the years in my archive and was even up at 7am to try and photograph frozen spiders webs on frosty mornings. 

    EB Primary 3

    Within my secondary research I could see that there were themes emerging and I was drawn to geometry, microscopic and medical images, and structures in nature.

    EB Secondary 1

    I was particularly drawn to certain colours to create my palette, and the different ways you could work with the proportions of those colours. If I can I will use all the colours available, so working with a specific palette gave me a fresh challenge and I love a challenge. We were introduced to using proportional and nonproportional colour inventories. I really like this idea.

    My understanding is that a proportional inventory uses the colours that appear in the images you have selected based on the amount in the picture. For example, if the picture has a lot of black, then black would be a big section of your palette and yarn winding. A non proportional inventory is the opposite where the colours are not used based on the amount they feature. Both offer lots of lots of design ideas.

    IMG_3720   IMG_3724

    I started creating surfaces on which to undertake some experimental drawing and mark making, which led me to discovering the technique of pouring acrylics and making cells within this technique. Well, that was it! I was away with the help of YouTube. 

    Workflow shot

    I had a few practice pieces in colours that were outside my palette and then had a go with my colours. Initially I was painting in the garden and then it started to rain. I moved inside, spreading out pieces to dry where the cat would not tread in them. I inadvertently did though! Whoops! Fortunately I had only trodden in my practice pieces. There are different ways of applying the paint and getting it to spread. Using a drop of silicon in the paint mix makes the cells appear. I also appropriated my husband's kitchen blow torch to dispel air bubbles, not set the house on fire.

    IMG_3732

    IMG_3733

    I created my pieces on A5 size boards as I knew I would be photographing them and I was also conscious of using up too much paint in one go.

    IMG_3761 (1)

    IMG_3748

    I was very pleased with the results considering I am new to the technique, though the real magic came when I zoomed in on my camera when photographing the pieces, much like zooming in on a microscope. This was exciting. Suddenly I could really see all the ‘cells’ I had created. 

    IMG_3770

    IMG_3769

    IMG_3810

    I created my yarn windings with my colour palette and some design ideas for products. We went through using photoshop to create repeat patterns. I use Affinity Designer so I was following closely to make sure I could replicate everything. I applied a couple of ideas to clothing, taking sections of elements from the photos where I had zoomed in on a section. I found that a bit flat for me, however, I do love creating the repeat patterns. To create my initial ideas I simply took paintings and mirrored them to create repeat blocks. I also tried taking pebble shaped sections from photos to create a block. I liked the effect and there is so much more to play with here.

    Digital print fabric 4

    Digital print fabric 3

    Working in a creative industry it may seem a bit strange to go back and do a course in design. When I was learning my trade nearly 20 years ago we just did not use computers in this way, well not at all really. With access to so many print on design options I wanted to learn more. I am also an eternal learner and sometimes in order to make progress I find you have to step out of your comfort zone and even go back and revisit areas. It is also a great way to get feedback and advice on developing my work. This allows me to open up to new possibilities and how I can improve my working practices. I’ve even purchased a graphics tablet (electronic device, not a type of medication) so I am heading into the current century!

    Digital print fabric 1       Digital print fabric 2

    What is next for me? More design practice and product development. I received some encouraging feedback on the course and I want to put that into developing my ideas. I do want to learn more about acrylic pouring as I like the possibilities for fabric design using this technique. I plan to exhibit some of my fabrics and design portfolio as part of Bucks Art Weeks in June 2021.

    It was always going to happen. I did also have some leather printed too.....

    Digitally printed leather 1

    And to finish with, a new tie for Mark. He grew some tomatoes about ten years or so ago. He did very well and I decided to turn them into a tie.

    Mark in his tomato tie    Marks tomato tie on a bench

  3. I have just posted a new video about how I saddle stitch on my YouTube channel Elizabeth Bond The Smart Stitcher. This is the first of three videos about three of the ways I use to hand sew leather. Being a stitcher it was very exciting to learn another sewing method when I started leather work. Learning saddle stitch is often popular in the classes I teach, yet it is something students find frustrating to get to grips with. 

    Some experienced stitchers expect to start saddle stitching at an expert level, based on their existing sewing experience. I first learnt just over ten years ago and I was no exception. I thought I had mastered it and then when I was learning to make moccasins with Rose Choules, I then realised I was not being consistent as my stitches were very uneven. Rose is an excellent teacher, shoemaker and leather worker who helped me unpick my technique and get back on track.

    IMG_1621 (1)

    Saddle stitch, just like any other stitch, is about the position of your needles and your loops. If you are consistent with this then you are away. I consider myself an eternal learner and always do a quick practice before starting a new project. There is nothing more frustrating that completing a line of stitches and realising that one in the middle is uneven because the loops were in the wrong place. The pain!

    I often get asked questions about sewing leather and just how you push a needle through thick leathers. I always say preparing your leather is a key part of preparing for saddle stitch. This means accurately scoring and marking out your stitches with a pricking iron through to using the awl to create a hole just large enough for the needle to go through. A big part of this is making sure you adjust the awl position if any of your pricking marks are uneven, so you can keep everything straight and accurate.

    IMG_1611

    I find saddle stitching very therapeutic and enjoyable. I like to ensure I have set some time aside to do it. I find if I am feeling stressed or trying to rush it always shows in my stitching, so it is worth taking some time to relieve the stress of the day and then be able to be completely in the stitching zone.

    This is the link to the video (which you may need to cut and paste into a new browser window).

    https://www.youtube.com/watch?v=fW0_1ycfmWM


  4. I was so pleased to be invited to contribute to The Society of Shoefitters newsletter for Spring/Summer 2021. I consider my shoemaking in a fledgling state as I think there is still so much to learn. I want to expand this in the future and make more shoes. The shoes featured in the article are those I made on courses with Hetty Rose (the green ones) and at the London College of Fashion (black with embroidered heels).

    Here is the article in full:

    Training to be a shoe fitter seemed an obvious step after I had fallen in love with making shoes. 

    As an eternal learner and maker I like to ‘look under the bonnet’ and understand how things are made. I enjoy the challenge of moving a project from paper to three dimensional form. This could be making clothes, gloves or constructing templates for leather work projects. Currently on the workbench I am making a pair of bespoke shoes for playing the organ. A special request from a customer local to me who is wanting to take her organ playing to new heights.

    I am a bespoke maker of leather goods. I teach leather work and sewing skills. I currently teach food and nutrition part time in a secondary school and run my own business, The Smart Stitcher, alongside this. Very different from my career as a mental health nurse when I left college. I have always loved making and in 2003 was lucky enough to gain a place at the Royal School of Needlework, on their three year apprenticeship. I changed career and dived into the world of high end embroidery. After my apprenticeship I trained as a teacher in textiles and Art. 

    In 2010 I discovered leather work and one thing led to another. I love the challenge of working with leather and the precision that is demanded. This was certainly a good challenge for my needlework skills. Having worked my way through making a range of leather goods and a whole host of courses, I discovered shoe making. Well that was it, I was hooked. I have been lucky enough to meet and train with some amazing people learning how shoes are made. At exhibitions I would talk and display the shoes I had made, having interesting conversations about feet and foot problems, so much so, that learning how to fit shoes seemed the obvious next step.

    I have to make a confession here and I don’t know if I should tell you this. In 2018 I fell in love with high heels. I did not plan for it or ever imagine it would happen. I have never been able to wear any sort of heel, though I often imagine I can.  I entered into the spirit of things whilst learning about shoe design and that was it. Then came the idea of adding embellishment to the shoes I make.

    Though my shoe making is still in a fledgling state, the knowledge I have from training to fit shoes is invaluable, not only for the understanding of the foot and what makes a good fit, but knowing the limits of my skill set and when to advise people to seek specialist advice. I now spend a lot of time watching feet when I am out and about! Working in a school you see such a wide variety of footwear and there are times I find myself wincing on behalf of students and staff.